Point your Web browser to the iClarified website and click on the link for the version of the iPhone software you want.
2
Click "Save" and then navigate to a location on your
computer to save the restore file. Pick "My Documents" on a PC,
"Documents" on a Mac or a similarly easy place to find your download.
3
Download RecBoot for your operating system. Visit the Javox
website and click the link labeled "Windows" or "Mac," depending on your
system.
4
Double-click on the installation file and follow the onscreen instructions to install RecBoot.
5
Connect your iPhone to your computer with its cable. Turn
your iPhone off. Next, hold down the "Power" button and "Home" button
for 10 seconds. Release the "Power" button but keep your finger on the
"Home" button for another five seconds. A pop-up window from iTunes
notifies you that it senses a device in recover mode. Click "OK."
6
Click on the iPhone icon in the left sidebar of iTunes. Hold
down the "Shift" key on a Windows computer or the "Alt" key on a Mac
computer and then click "Restore."
7
Navigate to the location of the iPhone software you
downloaded to your computer and select it. Your iPhone will take several
minutes to restore to the downgraded version of the iOS you selected.
The lower version of the iPhone operating system causes an error message
to display.
8
Double-click on the RecBoot application icon and then select
"Exit Recovery Mode." Your downgrade is now restored; iTunes senses the
older version and shows a prompt to set up your phone.
9
Click the drop-down menu to select a backup of your device
from the version of the phone software you just installed and then click
"Continue." If no early backup is available, you must install your apps
manually from the iTunes app store.
Price: Rs 2,999 Specs:
7-inch resistive display; 366 MHz processor, in addition to Graphics
Accelerator and HD Video Co-processor; 256 MB RAM; 2 GB Flash Memory
with 2 GB Micro SD card, expandable to 32 GB; Android 2.1 operating
system; Wi-Fi, GPRS; 2 USB ports; 2100 mAh battery.
First things first: You will not rave about the performance of the Ubislate, or Aakash
as the Government prefers to call it. Datawind's 7-inch tablet comes
with a sticky resistive touch display, a three-hour battery and no 3G
connectivity. The company does not even call it a tablet.
That
done with, now let's come to why it is here on the GG Choice page, which
features the best product of the month. Let's just put it this way:
Suddenly, you don't need a pricey smartphone to be able to access social
media sites, apps and multimedia, all at the same time. Yes, that is
why the Ubislate earns a place for itself on this page. It may only be a
poor relative in the whole family engendered by the iPad, but even with
its simplest of powers, it makes the members of the smartphones clan
look up and take notice.
Should you buy a low-cost tablet?
At
Rs 2,999, the Ubislate (the government-issue Aakash is tagged at $35 or
around Rs 1,700) is at least a couple of thousand rupees less than the
most basic Android phone. Even without 3G, it affords quick access to
the Internet via Wi-Fi and GPRS (the government version does not have
GPRS and speakers). Datawind's patented data-compression technology
makes web access via GPRS much quicker than normal. Its multimedia
capabilities are good, with loud audio and clear video on its 800x480
resolution screen. It runs on Android v2.1 and has a 2100 mAh battery.
Add Rs 300 more and you will get a keyboard plus protective case for the
tablet. (And for those who require such things, the 7 incher comes with
two USB ports...take that iPad and Galaxy Tab!)
iPad v/s tablet war heats up
Why
the price is important while putting the Ubislate in its correct place
in the tablet panoply is because it could trigger a fall in the price of
basic machines. Datawind is itself already working on giving the device
a capacitive screen and 3G connectivity. This version will be priced
around Rs 7,000, making it, when it releases, the cheapest 3G tablet in
the market. The aim thereafter is to bring down the price - through
sheer volume sales - to Rs 3,000. In fact, Suneet Singh Tuli, CEO of
Datawind, says that his company is trying to tweak costs to make the
capacitive screen avatar of the Government's Aakash available for the
same price as the current resistive screen version. It can dare such a
thing because, thanks to the Union HRD Ministry, it has guaranteed sales
of 1,00,000 units. Add to that the numbers from the commercial retail
of the Ubislate. Then think of where such a pricing would leave the
expensive smartphones or the mid-range tablets.
Roboticists develop man-made mechanical devices that can move by
themselves, whose motion must be modelled, planned, sensed, actuated
and controlled, and whose motion behaviour can be influenced by
“programming”. Robots are called “intelligent” if they succeed in
moving in safe interaction with an unstructured environment, while
autonomously achieving their specified tasks.
This definition implies that a device can only be called a “robot” if
it contains a movable mechanism, influenced by sensing, planning,
actuation and control components. It does not imply that a minimum
number of these components must be implemented in software, or be
changeable by the “consumer” who uses the device; for example, the
motion behaviour can have been hard-wired into the device by the
manufacturer.
So, the presented definition, as well as the rest of the material in
this part of the WEBook, covers not just “pure” robotics or only
“intelligent” robots, but rather the somewhat broader domain of
robotics and automation. This includes “dumb” robots such as: metal
and woodworking machines, “intelligent” washing machines, dish washers
and pool cleaning robots, etc. These examples all have sensing,
planning and control, but often not in individually separated
components. For example, the sensing and planning behaviour of the
pool cleaning robot have been integrated into the mechanical design of
the device, by the intelligence of the human developer.
Robotics is, to a very large extent, all about system integration,
achieving a task by an actuated mechanical device, via an
“intelligent” integration of components, many of which it shares with
other domains, such as systems and control, computer science,
character animation, machine design, computer vision, artificial
intelligence, cognitive science, biomechanics, etc. In addition, the
boundaries of robotics cannot be clearly defined, since also its
“core” ideas, concepts and algorithms are being applied in an ever
increasing number of “external” applications, and, vice versa, core
technology from other domains (vision, biology, cognitive science or
biomechanics, for example) are becoming crucial components in more and
more modern robotic systems.
This part of the WEBook makes an effort to define what exactly is that
above-mentioned core material of the robotics domain, and to describe
it in a consistent and motivated structure. Nevertheless, this chosen
structure is only one of the many possible “views” that one can want
to have on the robotics domain.
In the same vein, the above-mentioned “definition” of robotics is not
meant to be definitive or final, and it is only used as a rough
framework to structure the various chapters of the WEBook. (A later
phase in the WEBook development will allow different “semantic views”
on the WEBook material.)
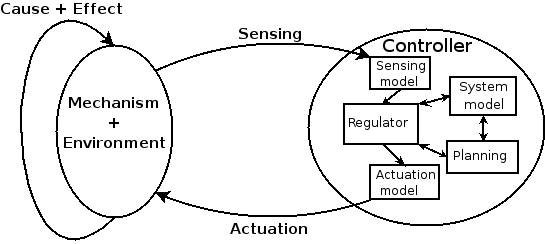
Components of robotic systems
This figure depicts the components that are part of all robotic
systems. The purpose of this Section is to describe the semantics of
the terminology used to classify the chapters in the WEBook:
“sensing”, “planning”, “modelling”, “control”, etc.
The real robot is some mechanical device (“mechanism”) that moves
around in the environment, and, in doing so, physically interacts with
this environment. This interaction involves the exchange of physical
energy, in some form or another. Both the robot mechanism and the
environment can be the “cause” of the physical interaction through
“Actuation”, or experience the “effect” of the interaction, which can
be measured through “Sensing”.
Robotics as an integrated system of control interacting with the
physical world.
Sensing and actuation are the physical ports through which the
“Controller” of the robot determines the interaction of its mechanical
body with the physical world. As mentioned already before, the
controller can, in one extreme, consist of software only, but in the
other extreme everything can also be implemented in hardware.
Within the Controller component, several sub-activities are often
identified:
Modelling. The input-output relationships of all control components
can (but need not) be derived from information that is stored in a
model. This model can have many forms: analytical formulas, empirical
look-up tables, fuzzy rules, neural networks, etc.
The name “model” often gives rise to heated discussions among
different research “schools”, and the WEBook is not interested in
taking a stance in this debate: within the WEBook, “model” is to be
understood with its minimal semantics: “any information that is used
to determine or influence the input-output relationships of components
in the Controller.”
The other components discussed below can all have models inside. A
“System model” can be used to tie multiple components together, but it
is clear that not all robots use a System model. The “Sensing model”
and “Actuation model” contain the information with which to transform
raw physical data into task-dependent information for the controller,
and vice versa.
Planning. This is the activity that predicts the outcome of potential
actions, and selects the “best” one. Almost by definition, planning
can only be done on the basis of some sort of model.
Regulation. This component processes the outputs of the sensing and
planning components, to generate an actuation setpoint. Again, this
regulation activity could or could not rely on some sort of (system)
model.
The term “control” is often used instead of “regulation”, but it is
impossible to clearly identify the domains that use one term or the
other. The meaning used in the WEBook will be clear from the context.
Scales in robotic systems
The above-mentioned “components” description of a robotic system is to
be complemented by a “scale” description, i.e., the following system
scales have a large influence on the specific content of the planning,
sensing, modelling and control components at one particular scale, and
hence also on the corresponding sections of the WEBook.
Mechanical scale. The physical volume of the robot determines to a
large extent the limites of what can be done with it. Roughly
speaking, a large-scale robot (such as an autonomous container crane
or a space shuttle) has different capabilities and control problems
than a macro robot (such as an industrial robot arm), a desktop robot
(such as those “sumo” robots popular with hobbyists), or milli micro
or nano robots.
Spatial scale. There are large differences between robots that act in
1D, 2D, 3D, or 6D (three positions and three orientations).
Time scale. There are large differences between robots that must react
within hours, seconds, milliseconds, or microseconds.
Power density scale. A robot must be actuated in order to move, but
actuators need space as well as energy, so the ratio between both
determines some capabilities of the robot.
System complexity scale. The complexity of a robot system increases
with the number of interactions between independent sub-systems, and
the control components must adapt to this complexity.
Computational complexity scale. Robot controllers are inevitably
running on real-world computing hardware, so they are constrained by
the available number of computations, the available communication
bandwidth, and the available memory storage.
Obviously, these scale parameters never apply completely independently
to the same system. For example, a system that must react at
microseconds time scale can not be of macro mechanical scale or
involve a high number of communication interactions with subsystems.
Background sensitivity
Finally, no description of even scientific material is ever fully
objective or context-free, in the sense that it is very difficult for
contributors to the WEBook to “forget” their background when writing
their contribution. In this respect, robotics has, roughly speaking,
two faces: (i) the mathematical and engineering face, which is quite
“standardized” in the sense that a large consensus exists about the
tools and theories to use (“systems theory”), and (ii) the AI face,
which is rather poorly standardized, not because of a lack of interest
or research efforts, but because of the inherent complexity of
“intelligent behaviour.” The terminology and systems-thinking of both
backgrounds are significantly different, hence the WEBook will
accomodate sections on the same material but written from various
perspectives. This is not a “bug”, but a “feature”: having the
different views in the context of the same WEBook can only lead to a
better mutual understanding and respect.
Research in engineering robotics follows the bottom-up approach:
existing and working systems are extended and made more versatile.
Research in artificial intelligence robotics is top-down: assuming
that a set of low-level primitives is available, how could one apply
them in order to increase the “intelligence” of a system. The border
between both approaches shifts continuously, as more and more
“intelligence” is cast into algorithmic, system-theoretic form. For
example, the response of a robot to sensor input was considered
“intelligent behaviour” in the late seventies and even early eighties.
Hence, it belonged to A.I. Later it was shown that many sensor-based
tasks such as surface following or visual tracking could be formulated
as control problems with algorithmic solutions. From then on, they did
not belong to A.I. any more.........
Install and run VirtualBox and then
click the 'New' button to create a new virtual machine (or VM for
short). Give your virtual machine (or VM for short) an obvious name,
such as "Windows 8 CP" and then select Microsoft Windows as your OS type
and Windows 8 from the drop down menu, or Windows 8 (64-bit) if you're
going down that route.
2. Minimum specifications
The
next screen enables you to define how much memory your virtual system
has. Windows 8 has a minimum memory requirement of 1GB for the 32-bit
version, but we'd recommending electing to go for 2048MB unless your
physical machine is a bit strapped for RAM. Click Next.
3. Create a drive image
The
next step defines the virtual drive for your installation. Elect to go
with the default setting to create a new hard disk. On the next screen
leave the type as a VDI drive image – VirtualBox's own file format. It's
fine to leave this virtual drive as being Dynamically allocated as
well.
4. Size matters
Define
where you want the Virtual disk to reside and change the initial drive
size if you feel the need – although the default 20GB default size
should be fine. After installation our Windows 8 sat at 7GB. Check the
Summary is correct and then when you're ready, hit the Create button.
5. Virtual optical
Right-click
the Windows 8 CP and select Settings from the drop-down list. Click on
Storage, then the CD icon under IDE Controller, next click the CD icon
to the right of the controller to locate your Windows 8 ISO and elect to
Choose a virtual CD/DVD disk file… Point it at your Windows 8 ISO you
have downloaded and then click Open.
6. Install Windows 8
You're
now set to install Windows 8 CP on your virtual machine. Just make sure
the virtual PC is highlighted and then hit the Start button. The
installation of Windows 8 is fairly straightforward, just ensure you
elect to pick a custom installation. Complete the installation and log
into your account.
7. Guest Additions
Installing
Guest Additions is a little trickier, as you need to install them in
Safe Mode. Go to the desktop view and hit [Win]+R and launch MSConfig.
Click the Boot tab, check the Safe boot and Base Video options and then
OK the changes, choosing to reboot into Safe Mode.
8. Improve system integration
Install
the Guest Additions from the VirtualBox Devices menu, enabling full 3D
support when prompted. Don't reboot, instead clear the Safe boot and
Base video options in MSConfig and then power off the VM. Increase the
video memory to 128MB in the Display settings for the VM and enable 3D
and 2D acceleration. Launch the VM and your done.
Windows 8 opens on its lock screen, which looks pretty but unfortunately displays no clues about what to do next.
It's
all very straightforward, though. Just tap the space bar, spin the
mouse wheel or swipe upwards on a touch screen to reveal a regular login
screen with the user name you created during installation. Enter your
password to begin.
2. Basic navigation
Windows 8 launches
with its new Metro interface, all colourful tiles and touch-friendly
apps. And if you're using a tablet then it'll all be very
straightforward: just swipe left or right to scroll the screen, and tap
any tile of interest.
On a regular desktop, though, you might alternatively spin the mouse wheel to scroll backwards and forwards.
And
you can also use the keyboard. Press the Home or End keys to jump from
one end of your Start screen to the other, for instance, then use the
cursor keys to select a particular tile, tapping Enter to select it.
Press the Windows key to return to the Metro screen; right-click (or
swipe down on) apps you don't need and select Unpin to remove them; and
drag and drop the other tiles around to organise them as you like.
3. App groups
The
Start screen apps are initially displayed in a fairly random order, but
if you'd prefer a more organised life then it's easy to sort them into
custom groups.
You might drag People, Mail, Messaging and Calendar
over to the left-hand side, for instance, to form a separate "People"
group. Click the magnifying glass icon in the bottom right corner of the
screen to carry out a "semantic zoom", and you'll now find you can drag
and drop the new group (or any of the others) around as a block.
Right-click
within the block (while still in the semantic zoom view) and you'll
also be able to give the group a name, which - if you go on to add
another 20 or 30 apps to your Start screen - will make it much easier to
find the tools you need.
4. Simplified Start menu?
The
Windows 8 Developer Preview had a very basic Start menu which you could
access by swiping from the right side of a touch screen, or moving the
mouse cursor to the bottom left corner of the screen. This has changed a
little in the Consumer Preview: now you need to right-click in the
bottom left corner (or hold down the Windows key and press X) for a
text-based menu which provides easy access to lots of useful applets and
features: Device Manager, Control Panel, Explorer, the Search dialog
and more.
5. Find your applications
The
Win+X menu is useful, but no substitute for the old Start menu as it
doesn't provide access to your applications. To find this, hold down the
Windows key and press Q (or right-click an empty part of the Start
screen and select All Apps) to reveal a scrolling list of all your
installed applications. Browse the various tiles to find what you need
and click the relevant app to launch it.
6. Easy access
If
there's an application you use all the time then you don't have to
access it via the search system, of course. Pin it to the Start screen
and it'll be available at a click.
Start by typing part of the
name of your application. Windows 8 Consumer Preview makes it more
difficult to access Control Panel, for instance, so type Control.
Right-click the "Control Panel" tile on the Apps Search screen, and click "Pin to Start".
Now
press the Windows key, scroll to the right and you'll see the Control
Panel tile at the far end. Drag and drop this over to the left somewhere
if you'd like it more easily accessible, then click the tile to open
the desktop along with the Control Panel window, and press the Windows
key to return you to the Start screen when you've done.
7. Shutting down
You've
finished your first Windows 8 session, and would like to close your
system down - but with no Start menu it's not exactly obvious how this
can be done.
It's easy enough when you know the secret, though.
Just move the mouse cursor to the bottom right corner of the screen,
click the Settings icon - or just hold down the Windows key and press I -
and you'll see a power button. Click this and choose "Shut down" or
"Restart".
Some of the tricks available in previous versions of
Windows still apply. Press Ctrl+Alt+Del, for instance, click the power
button in the bottom right-hand corner and you'll be presented with the
same "Shut down" and "Restart" options.
And if you're on the desktop, press Alt+F4 and you'll be able to choose Shut Down, Restart, Sign Out or Switch User options.
Add internal links: This is most simple method to increase your
pageviews. Whenever you write an article, check whether you have written
similar articles. If so link to them. This is helpful for new readers
as well as it is not necessary that all your readers have been with you
from the beginning. But remember that too much interlinking can get your
readers distracted from the original post.
Try related posts: For blogger users there is a plugin called
Related Posts that can automatically find related posts for you based on
the keywords you used in the article. You can do this manually if you
want, but I prefer the plugin as it is a lot easier. There may be a
similar plugin for other Blog Platforms, but I am not sure about it.It
is best that you place 5 related posts just after the post ends. You can
find more useful blogger Plugins here.
Add a Newsletter or Post Notification Services: Services such
Zookoda and FeedBurner can be used to notify readers of new posts via
email thereby increasing page views. I think that notifying new posts
through emails are more effective than feeds as people check their mails
many times a day.
Highlight Key Posts in Prominent Positions: You may have noticed
that my header links to some of the important articles of johntp.com.
When visitors reach this blog there’s a high chance that they will
notice these links and click them. My header links has helped me almost
double my pageviews.
Best of Pages: I have collected some of the best articles and put
them on a separate page called Top Posts. This not only helps to
increase pageviews but also helps in converting casual surfers to
regular readers.I also use a blogger Plugin called ‘Noteworthy‘ with
which I mark some of the interesting articles. The plugin automatically
puts the marked posts to a category. This can also help in increasing
the pageviews of those posts. In short highlight your top posts in all
ways possible.
Write a Series of Posts: A series of posts on a topic can drive
readers from the first part to the last thereby increasing pageviews.
Readers will also return often to read what you have to say on the next
part.Although I suggest you don’t break every article into a series of
posts as it may irritate some readers.
Use Extended Entires on your Front Page: For blogger users there is
a ‘more’ feature that breaks long posts with a ‘more…’ or ‘Continue
reading post name‘ that links to the complete post. This can help in
increasing pageviews but you must use it only for long posts as it can
get annoying for certain readers when used too much.
Run a Blog Project or Meme: Group writing projects can get you new
links and readers aswell as visitors who come back multiple times in a
week to see what updates there had been to it. Projects or competitions
works best if you have a lot of loyal readers willing to participate.
Excerpts in RSS feeds: If you use Full Feeds, your readers are
likely to read your content through feeds and never return to your blog.
To increase page views you may switch to Partial Feeds.Here at
johntp.com, after switching to partial feeds I have found an increase in
the number of people coming back and an unexpected increase in RSS
readers.
Entice RSS Readers to Visit: If you decide to use Full feeds, you
need to find ways to get your subscribers to visit your blog. i suggests
methods such as Polls, writing posts in a way that invites comments and
interlinking posts.
Build Interactivity into your Blog: The more your readers interact
on your blog the more pages they view. Comments and polls are a good way
to interact with readers.You can encourage comments by asking question
or opinions at the end of evey post. If a reader leaves a comment or
takes part in a poll they are likely to come back again to see if there
are any replies to their comments or to find out the result of the poll.
Building an interactive blog can increase your pageviews a lot.
Draw People Back to Comments: For blogger users there are a few
plugins that help you make your blog more interactive regarding
comments. First is a plugin called Brian’s Latest Comments that shows an
overview of the recently active articles and the last people to comment
on them.You can also give your readers the opportunity to follow your
comments either by having a RSS feed for comments on your blog or by
allowing them to subscribe to comments via email with Subscribe To
Comments blogger Plugin.You can encourage your readers to comment more
often by listing the Top 10 Commentators of your blog and linking
directly to their blogs. You can do this automatically with the Top
Commentators blogger Plugin.You can see all these plugins in action on
my blog and find more here.
Add a Search Feature: Adding a Search feature to your blog allows
your readers to search for previous posts thereby increasing pageviews.
Your theme may already be having it by default.
Give Your Readers a Homework Assignment: I have not yet tried this
method and so can’t comment on it. I am not even sure if it will work
for my kind of blog. This method has more chance of working on blogs
like laxman Photography Blog
Airtel mobile office Manual settings
Airtel mobile office Manual settings
Here i will post the default settings of mobile office in Airtel.Most
of the airtel users dont know the default settings for airtel mobile
office and usually they make calls to customer care to get it and it
takes a lot of waiting.here i will provide the default settings of airte
mobile office and you can set it manually,the settings is as follows;
Account Name : Mobile Office
Homepage: http://www.google.com
Accespoint : airtelgprs.com
Leave username and password as blank
Proxy : disabled/No
Data bearer : GPRS/ Packet Data
Authentication Type : Normal
Robots can be used in almost any situation and are primarily
intended to help humans in some way, shape or form. If you are unsure of
what you want your robot to do or simply want to concentrate your
efforts on specific tasks, here are some ideas:
Amusement & Companionship
Building a robot in and of itself is fun and exciting. Robotics
incorporates aspects of many disciplines including engineering
(mechanical, electrical, computer), sciences (mathematics and physics)
and arts (aesthetics) and users are free to use their imagination.
Amusing others with your creations (especially if they are user-friendly
and interactive) helps others to become interested in the field.
Knowledge & Learning
In order to build increasingly complex robots, most professionals and
hobbyists use knowledge they have acquired when building previous
robots. Instead of building one robot, you can learn how to use
individual components with the objective of building your own “knowledge
library” to use to undertake a larger, more complex design in the
future.
Competitions & Contests
Competitions give the project design guidelines and a due date. They
also put your robot against others in the same class and test your
design and construction skills. Although many competitions are
specifically for students (elementary to university), there also exist
open competitions where adults and professionals alike can compete.
Autonomous life form
Humans are natural creators and innovators. The next great innovation
will be to develop a fully autonomous life form that rivals or surpasses
ourselves in ability and perhaps creativity. This goal is still being
accomplished in small steps by individuals, research organizations and
professionals.
Domestic or Professional tasks
Domestic robots help liberate people from unpleasant or dangerous tasks and give them more liberty and security. Professional and Service Robots
are used in a variety of applications at work, in public, in hazardous
environments, in locations such as deep-sea, battlefields and space,
just to name a few. In addition to the service areas such as cleaning,
surveillance, inspection and maintenance, we utilize these robots where
manual task execution is dangerous, impossible or unacceptable.
Professional and Service Robots are more capable, rugged and often more
expensive than domestic robots
and are ideally suited for professional and/or commercial use.
RobotShop’s lineup of professional and service robots is always
expanding...

 Android OS, v2.3.5 (Gingerbread)


 Building a robot in and of itself is fun and exciting. Robotics
incorporates aspects of many disciplines including engineering
(mechanical, electrical, computer), sciences (mathematics and physics)
and arts (aesthetics) and users are free to use their imagination.
Amusing others with your creations (especially if they are user-friendly
and interactive) helps others to become interested in the field.
Building a robot in and of itself is fun and exciting. Robotics
incorporates aspects of many disciplines including engineering
(mechanical, electrical, computer), sciences (mathematics and physics)
and arts (aesthetics) and users are free to use their imagination.
Amusing others with your creations (especially if they are user-friendly
and interactive) helps others to become interested in the field.


 In order to build increasingly complex robots, most professionals and
hobbyists use knowledge they have acquired when building previous
robots. Instead of building one robot, you can learn how to use
individual components with the objective of building your own “knowledge
library” to use to undertake a larger, more complex design in the
future.
In order to build increasingly complex robots, most professionals and
hobbyists use knowledge they have acquired when building previous
robots. Instead of building one robot, you can learn how to use
individual components with the objective of building your own “knowledge
library” to use to undertake a larger, more complex design in the
future.


 Competitions give the project design guidelines and a due date. They
also put your robot against others in the same class and test your
design and construction skills. Although many competitions are
specifically for students (elementary to university), there also exist
open competitions where adults and professionals alike can compete.
Competitions give the project design guidelines and a due date. They
also put your robot against others in the same class and test your
design and construction skills. Although many competitions are
specifically for students (elementary to university), there also exist
open competitions where adults and professionals alike can compete.


 Humans are natural creators and innovators. The next great innovation
will be to develop a fully autonomous life form that rivals or surpasses
ourselves in ability and perhaps creativity. This goal is still being
accomplished in small steps by individuals, research organizations and
professionals.
Humans are natural creators and innovators. The next great innovation
will be to develop a fully autonomous life form that rivals or surpasses
ourselves in ability and perhaps creativity. This goal is still being
accomplished in small steps by individuals, research organizations and
professionals.


 Domestic robots help liberate people from unpleasant or dangerous tasks and give them more liberty and security. Professional and Service Robots
are used in a variety of applications at work, in public, in hazardous
environments, in locations such as deep-sea, battlefields and space,
just to name a few. In addition to the service areas such as cleaning,
surveillance, inspection and maintenance, we utilize these robots where
manual task execution is dangerous, impossible or unacceptable.
Professional and Service Robots are more capable, rugged and often more
expensive than domestic robots
and are ideally suited for professional and/or commercial use.
RobotShop’s lineup of professional and service robots is always
expanding...
Domestic robots help liberate people from unpleasant or dangerous tasks and give them more liberty and security. Professional and Service Robots
are used in a variety of applications at work, in public, in hazardous
environments, in locations such as deep-sea, battlefields and space,
just to name a few. In addition to the service areas such as cleaning,
surveillance, inspection and maintenance, we utilize these robots where
manual task execution is dangerous, impossible or unacceptable.
Professional and Service Robots are more capable, rugged and often more
expensive than domestic robots
and are ideally suited for professional and/or commercial use.
RobotShop’s lineup of professional and service robots is always
expanding...
